Gulf Shores Father's Day Mini-Split Tutorial: When DIY Stops
Gulf Shores mini-split DIY tutorial — the steps a homeowner can reasonably do, and the line-set vacuum pull where it goes wrong without the right gear and license.
Published 2026-06-12 · Updated 2026-06-12
Author: Landon Jahnke | ACExperts251
Reviewed by: Landon Jahnke · Owner · Alabama HVAC License AL #16117 · EPA 608 Certified
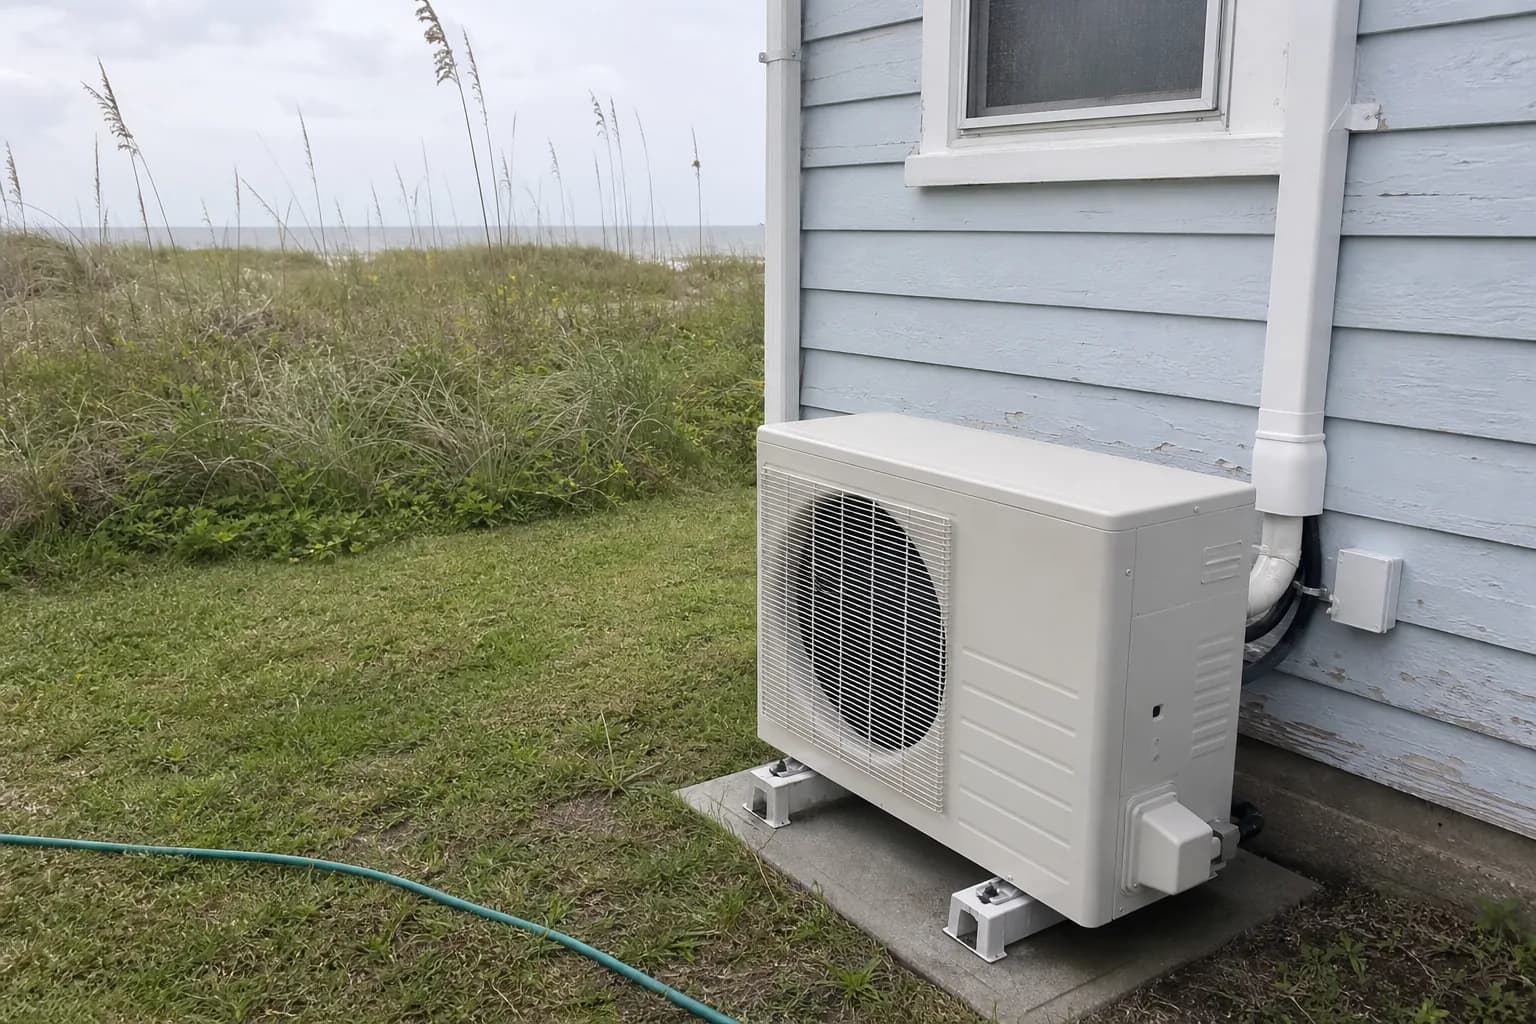
Camera one: the outdoor unit, sitting on the workbench in the garage, still half-wrapped in packing styrofoam. Manufacturer's seal intact. Pre-charged with R-410A from the factory. The two service ports — high side and low side — visible at the top right of the cabinet, capped with brass.
Camera two: the indoor cassette, mounted to a stud-finder line on the garage drywall. Level, plumb, two lag screws into the bracket. The line set conduit pre-drilled through the exterior wall, sleeved, and angled slightly downward for condensate drainage. Indoor electrical whip not yet connected.
Camera three: the homeowner, Mitsubishi installation manual open on the workbench, brass flare wrench in hand, garage door open, a sweating Coke on the bench, country radio playing.
The angle nobody's filming is the one where the install actually goes wrong. That's the line set vacuum pull, the moment after the flare connections are made and before the refrigerant is released. It's not visually exciting — a vacuum pump humming, a digital gauge reading, the installer sitting on a stool reading the manual — but it's where DIY mini-split installs in Gulf Shores consistently fail.
Start there.
Camera four: the vacuum pull
The vacuum pull is the step where you connect a refrigerant manifold to the service port, run a vacuum pump for 30-45 minutes, and pull the air and moisture out of the line set down to a target pressure of 500 microns or below. After that, you isolate the gauges and watch — the pressure must hold below 500 microns for at least 10 minutes with the pump off, indicating no leaks and no remaining moisture.
Below 500 microns sounds like a small number. It is. It's also the difference between a mini-split that runs efficiently for 15 years and one that develops a slow refrigerant problem in three.
Here's why. R-410A refrigerant is hygroscopic — it picks up water from any air left in the line set. Water in a refrigerant system creates two problems. First, it freezes at the metering device, blocking flow and starving the indoor coil. Second, it reacts with R-410A and the lubricating oil to form acidic compounds that eat copper, eat compressor windings, and eat valve seats. A system installed without a proper vacuum pull doesn't fail immediately — it fails on a delay, six months to three years later, in ways that look unrelated to installation.
A standard hardware-store vacuum pump won't get you to 500 microns. The pumps sold in homeowner kits typically achieve 1500-2500 microns and aren't equipped for the deep evacuation a refrigerant line set actually requires. The vacuum gauge that comes with a homeowner manifold is usually a needle-style gauge that doesn't read below 1000 microns at all — you can run it for an hour and have no idea whether you actually pulled the moisture out.
The right tools: a two-stage rotary vane vacuum pump rated to at least 75 microns ultimate, a digital micron gauge calibrated to read 0-1000 microns, a manifold with quality core-depressor fittings, and the patience to hold the pump on for as long as it takes — usually 30-45 minutes for a typical residential line set, longer if there's any moisture in the lines or any flare leak.
That's the gear gap. A homeowner with a cheap big-box vacuum kit cannot achieve a 500-micron evacuation. The job is real refrigerant work, and the licensing requirement exists because consequences are downstream and invisible at the moment of installation.
What camera three is doing right
A lot, actually. Credit where it's due.
The right indoor cassette location — high on the wall, on a partition wall, with a clear thermal-bath path through the garage. Mounted level. Studs found. Bracket template used. Line set penetration drilled with a 3-inch hole saw at the right downward angle for condensate drainage. Penetration sleeved. Line set routed with gradual bends rather than kinks. Outdoor unit location thought through against property lines, fence clearance, and the Craft Farms HOA rules.
Most of the work that takes time is the work being done well. The mounting, the structural decisions, the routing — that's all genuinely DIY-able for someone with home-improvement experience. It's a common Gulf Shores Father's Day project, particularly in older Craft Farms homes where the homeowner has done carpentry for years and doesn't need a contractor to drill a hole or hang a bracket.
What no amount of YouTube can teach is the refrigerant commissioning. That's the camera-four work.
Camera one revisited: the salt-air problem
While the manual is being read, look back at camera one. The outdoor unit on the workbench. There are two versions of this unit available from most manufacturers: standard and coastal-rated. The coastal-rated version costs more and includes factory-applied corrosion-resistant coatings on the coil, the cabinet, and the electrical connections.
In Gulf Shores, the right answer is almost always coastal-rated. Anywhere within a mile of the Gulf — which covers Craft Farms, The Peninsula, Laguna Key, West Beach, East Beach, and most of the residential community — salt deposits on outdoor coils accelerate corrosion to the point where a standard unit loses 5-7 years of practical lifespan. The math is straightforward: a modest upcharge on the coastal model versus the cost of replacing the unit five years earlier than necessary. The why coastal AC units fail faster post walks through the corrosion physics; the same logic applies to mini-splits, just with smaller equipment.
If the standard unit got bought because the big-box store didn't stock the coastal version, that's a fixable problem before the install proceeds. Pause, exchange, reorder. Don't install the wrong cabinet because it's already in the garage.
Camera two revisited: the condo question
Not every Gulf Shores Father's Day mini-split is going in a single-family home. A meaningful share are condo applications — sunrooms, enclosed balconies, garage units in townhouse stacks — and the rules are different.
Condo HOAs in Gulf Shores typically restrict three things relevant to mini-split installation:
Exterior unit placement. Most HOAs require outdoor condensers to be in approved locations — often a designated mechanical balcony, a screened side-yard area, or a roof-mounted location where the unit isn't visible from the front of the building. Setting the outdoor unit on the front patio because that's where the line set was easiest to run is the kind of decision that earns an HOA letter and a forced relocation at the homeowner's expense.
Line set visibility. Exposed line sets running across the exterior of a building are usually prohibited. The line set must be inside a wall cavity or hidden behind an architecturally appropriate cover. The white plastic line set covers sold at hardware stores aren't always acceptable — some HOAs require painted matched-finish covers.
Noise ratings. Some HOAs in Gulf Shores have explicit decibel limits on exterior mechanical equipment, particularly in close-spaced condo developments. A mini-split outdoor unit is generally quiet (45-55 dBA at typical operating loads), but a budget unit running at maximum capacity in a tight courtyard can exceed local limits. Check the spec sheet against the HOA rule before purchase.
The right sequence: read the HOA rules, get written approval for your specific install location, then buy equipment. Doing it the other direction is how Father's Day mini-split projects turn into HOA disputes that drag into July. The Gulf Shores vacation rental HVAC checklist covers some of the same condo-specific dynamics from the rental-owner angle.
The clean handoff
What an ACExperts handoff visit looks like in practice. The homeowner has done the mounting work and reached the refrigerant step. A 2-3 hour visit is scheduled. The truck shows up with a vacuum pump, a digital micron gauge, a manifold, refrigerant for top-off if needed, an electrical multimeter, and a torque wrench calibrated for flare fittings.
The visit sequence:
Inspection (15 minutes). Walk the install. Indoor cassette mounting, line set routing, outdoor unit location, electrical service availability. Look for the things that are easy to miss but expensive to redo later — line set kinks, condensate drain slope, electrical run within code, structural attachment of the outdoor unit. If something needs adjustment, you hear about it before any further work proceeds and you decide whether to fix it now or accept the consequence.
Flare connections (30 minutes). Flaring tool calibrated to manufacturer spec, deburr the line ends, apply refrigerant oil to the flares, torque the connections to spec with a torque wrench. If the homeowner has already flared the line ends, they get inspected — and if the flares aren't properly formed, they get cut and re-flared. No negotiating on this. A bad flare leaks, and a leak undoes all the rest.
Pressure test (30 minutes). Pressurize the line set with nitrogen to 500 PSI and watch for 15 minutes. If the pressure holds, proceed. If it drops, leak-search with electronic detectors and bubble solution. Better to find the leak now, dry, than after the refrigerant is released.
Vacuum pull (30-60 minutes). Pump on, target 500 microns, isolate, hold for 10 minutes minimum.
Refrigerant release (10 minutes). Open the service valves on the outdoor unit. The pre-charged refrigerant flows into the line set and indoor coil. Verify charge through gauge readings.
Electrical and commissioning (30-45 minutes). Connect the outdoor electrical, verify breaker sizing, energize the system, test heating and cooling modes, verify temperature differentials, register the warranty.
Total: 2-3 hours. Quote in writing before any work starts. The mini-split installation service page covers the full-install option for homeowners who don't want to do the mounting work themselves.
The cluster context
This post is part of the Father's Day cluster. Two siblings cover the same project from different angles: the Lillian Father's Day garage HVAC post walks through the planning conversation for far-southeast Baldwin County homeowners, and the Spanish Fort Father's Day garage post addresses tighter modern construction where the load calculation matters more.
For the Bay Minette version of the same conversation — older retrofit garages, more inland, different humidity profile — see the Bay Minette Father's Day mistakes post.
For the broader mini-split context, the ductless mini-split guide for Alabama homeowners covers sizing, placement, and equipment selection in detail.
Camera five: the shot that doesn't get filmed
There's a fifth camera angle that doesn't make the tutorial videos. It's the one looking at the same garage three weeks after the install, on July 5, at 6 PM with the mini-split humming. The garage is 73F. Outside is 94F. The garage door is closed. Project on the bench. Dog asleep on a piece of cardboard near the wall vent.
That's the install going right. The homeowner did the mounting work. Called for the refrigerant step. The vacuum pulled clean and held. The flares were dry on the pressure test. The first cooling cycle pulled a strong differential between supply and return. The labor cost stayed reasonable. Warranty registered.
That's the version where DIY and licensed work meet at the right line. Camera four is where DIY stops. Camera five is what it looks like when you stop there.
Call 251-383-HVAC to schedule the handoff visit. Tell us you're doing a Father's Day mini-split in Gulf Shores and need the refrigerant commissioning. We'll book it the same week if the calendar allows.
FAQ
- How much of a mini-split install can a Gulf Shores homeowner reasonably DIY?
- Mounting the indoor cassette, drilling the wall penetration, mounting the outdoor unit on a pad or wall bracket, and running the line set conduit through the wall — all reasonable DIY for someone with home-improvement experience. Where DIY stops is the line set flare connections, the vacuum pull on the line set, the refrigerant charge release from the pre-charged outdoor unit, and the electrical hookup. Those four steps require a refrigerant license, a calibrated micron gauge, and a vacuum pump capable of pulling and holding 500 microns or below. The practical play: a homeowner does the mounting and routing work, then a licensed contractor handles the refrigerant and electrical portion. Done that way, the install is safe, warranty-eligible, and the homeowner banks meaningful labor savings.
- Will my mini-split warranty be voided if I do part of the install myself?
- Mostly yes, unless a licensed installer signs off on the refrigerant work. Most major manufacturers (Mitsubishi, Daikin, LG, Fujitsu) require licensed installation for full parts and compressor warranty coverage. Some accept a hybrid model where the homeowner does mounting work and a licensed contractor commissions the system — call before you start to confirm what your specific brand requires. The warranty registration form usually has a contractor signature line.
- What's different about mini-split installation in Gulf Shores specifically?
- Three things. First, salt air corrosion — the outdoor unit needs coastal-rated coil coatings or it will lose efficiency in 5-7 years. Second, condo HOA restrictions — many Gulf Shores complexes have rules about exterior unit placement, line set runs visible from the building exterior, and noise ratings. Get HOA approval in writing before purchasing equipment. Third, hurricane-zone wall mounting — outdoor units on bracket mounts (rather than ground pads) need rated brackets and structural attachment to studs, not just drywall anchors.
- Can ACExperts come finish a partially completed Gulf Shores mini-split install?
- Yes. The clean handoff is: the indoor cassette is mounted, the outdoor unit is on its pad or bracket, the line set conduit is run through the wall, and the line set itself is run but not yet connected. From there, a licensed tech flares the line set ends, pressure tests with nitrogen, vacuum-pulls to 500 microns, releases refrigerant, completes the electrical, commissions the system, and provides warranty registration paperwork. Typical handoff visit is 2-3 hours. Call 251-383-HVAC to schedule.
ACExperts HVAC
We Take The Heat So You Don't Have To
Fast, honest heating and air service across Baldwin County. Speak with a technician and get on the schedule today.